This is a fantastic article about different selection techniques in Photoshop. Some are simple, some are quite involved, and all of them have potential uses. The article is originally from Tuts Plus.
Have you ever had difficulties making selections and thought there was a better way? Let’s review both quick solutions, and on the other side, comprehensive and details techniques for making selections. Each approach has it’s place in your workflow. The more methods you know how to use, the faster and more effectively you’ll move in Photoshop.
Selection in Photoshop
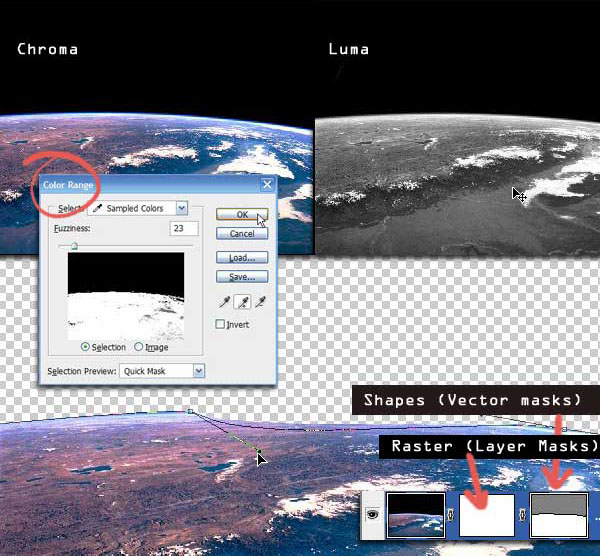
Photoshop selects pixels based one of the three properties, as shown in the image below:
- Chroma: is the color of the pixel. Color of a pixel is the level of RGB values and color based select tools like theMagic Wand. Select by color uses the RGB% as a criteria to group pixels based on the set tolerance values.
- Luma: is a selection based on Illumination levels. Illumination levels are whiteness of the image, which is nothing but higher values for all the three R, G and B channels. Photoshop doesn’t have a native interface for a Luma based selection, but many existing tools can be hacked to get a similar result.
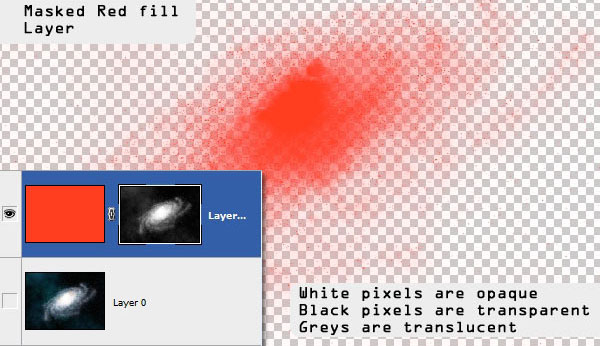
- Masks: are based on spatial position. Pixels are selected and discarded or masked by a parallel layer bound to corresponding image layer. Masks are grayscale and brightness of the mask is called an Alpha level, which is the degree of opaqueness of the corresponding layer pixel. It’s also called the Transparency/Opacity channel as in RGBA etc.
A Note on Masks
In this article, words like Masks and Alpha will be used interchangeably. The process of transferring images to layer masks will be shown once and then used repeatedly without explicitly mentioning thereafter.
Step 1
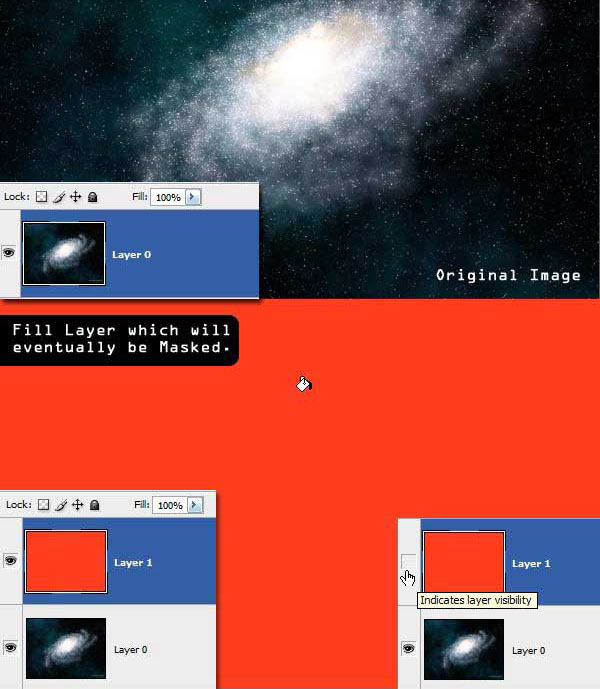
Open a new image that you want to use as a mask. Double-click the background layer and create a new layer, which is “Layer 0.” Make a new layer, which is “Layer 1,” on top of it and fill with a uniform color, then hide “Layer 1.”
Step 2
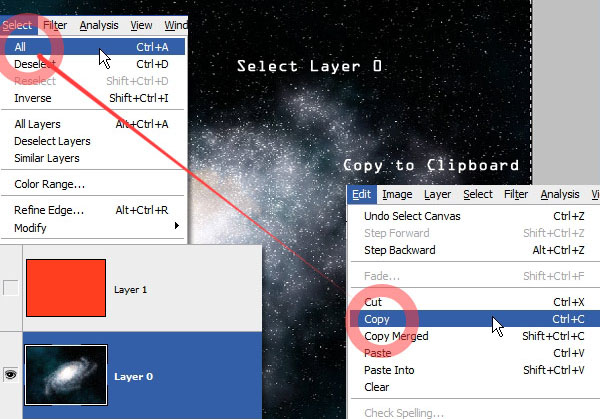
Go to “Layer 0″ and click Select > Select All (Command + A) to select all pixels. Next, click Edit > Copy (Command + C) to copy all pixels to the clipboard.
Step 3
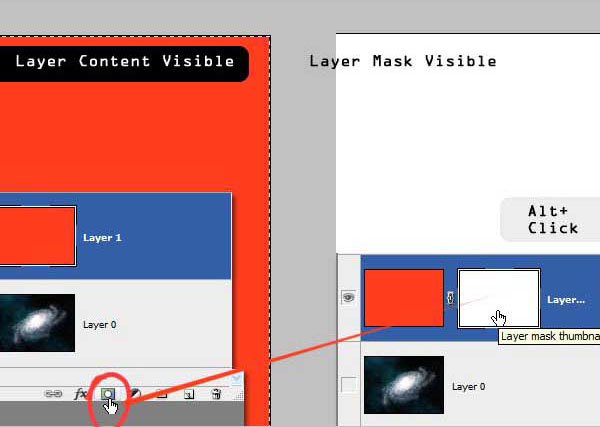
Go to “Layer 1″ and create an empty Layer Mask. Initially an all transparent Layer Mask will be created. Alt-click the layer mask to see it in the canvas.
Step 4
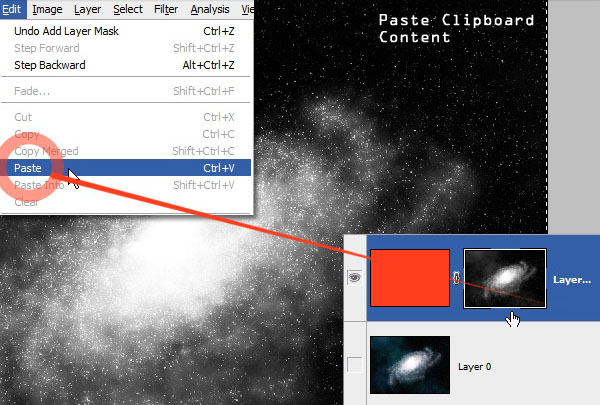
With the Layer Mask visible, paste onto the canvas by clicking Edit > Paste (Command + V). A grayscale version of the copied image will be pasted in as the layer mask.
Step 5
Click on the fill layer thumbnail (not mask) to see the result. Any image can be applied as a Layer Mask to another layer. The opacity of the layer will be controlled by grayscale level of the mask.
More on Masks
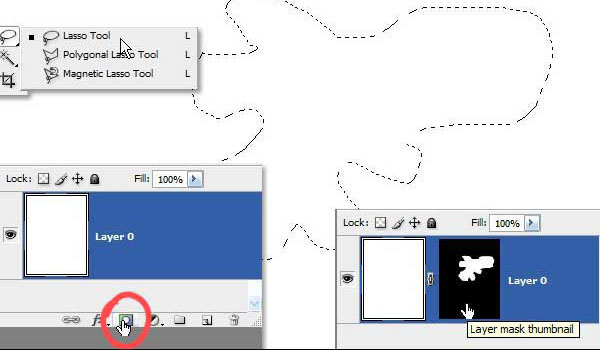
The easiest way of creating a Layer Mask is to click the Add Layer Mask button with something selected on the canvas. The selection will be saved as a layer mask attached to the current layer and everything outside the selection marquee will be masked and hidden.
Activate Layer Masks
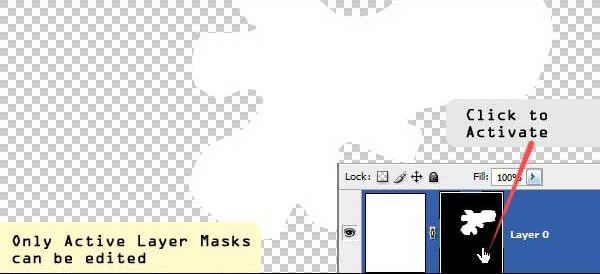
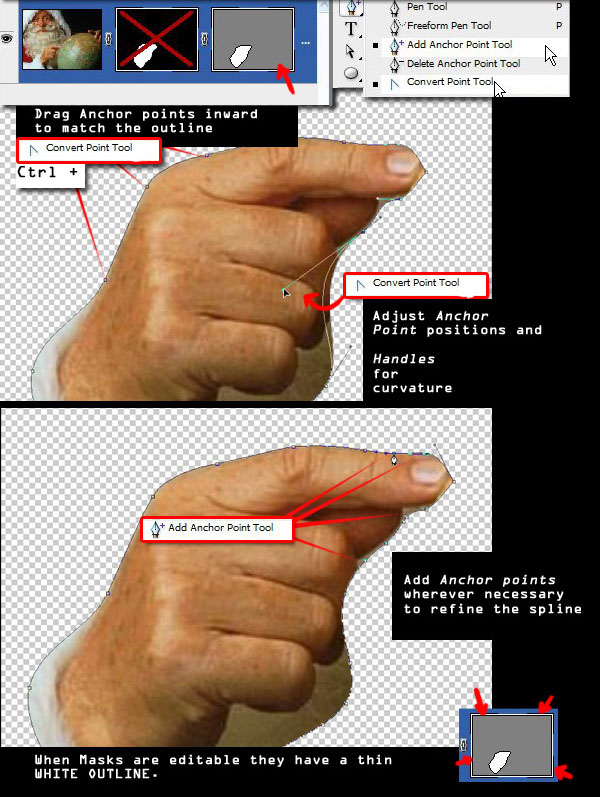
Alt-clicking on the Layer Mask makes it active for editing. Only activated layer masks can be edited which are represented by a thin white outline around them.
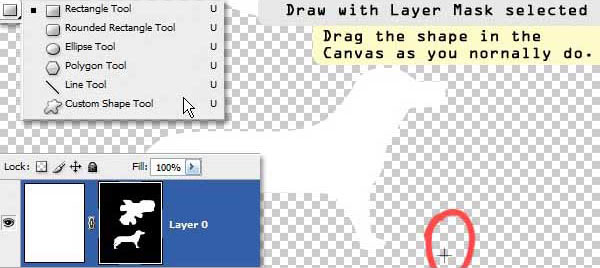
Add Shapes to Layer Masks
Dragging any shape onto the canvas while a layer mask has been activated will draw it on the Mask instead of the layer itself. To draw it again on the layer we need to deactivate the Mask by clicking on the layer thumbnail.
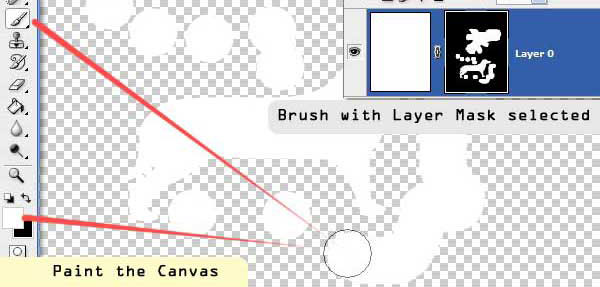
Add Brush Strokes to Layer Masks
The same is true for brush strokes. Anything painted on the canvas with a Layer Mask selected will draw it on the Mask instead of the Layer. We can use this property to select objects with irregular boundaries from backgrounds, by painting everything else black on the Layer Mask. White brush strokes will reveal and blacks will conceal.
Copying a Layer Mask to Another Layer
Finally, we can transfer the Layer Mask to another layers by simply loading it as a selection (Command-click) and unloading as we did in the first step by clicking the Add Layer Mask button. Or by Alt-dragging the mask to another Layer (Not Shown).
Boolean Operations with Selections
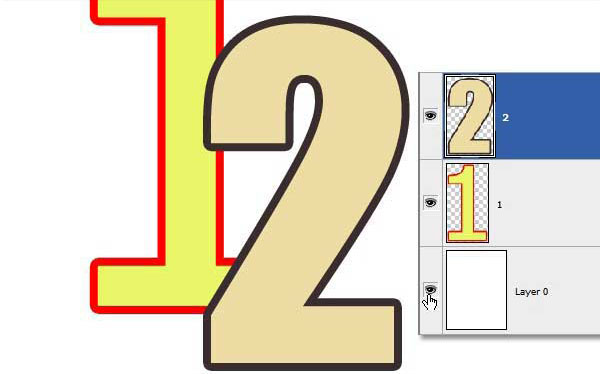
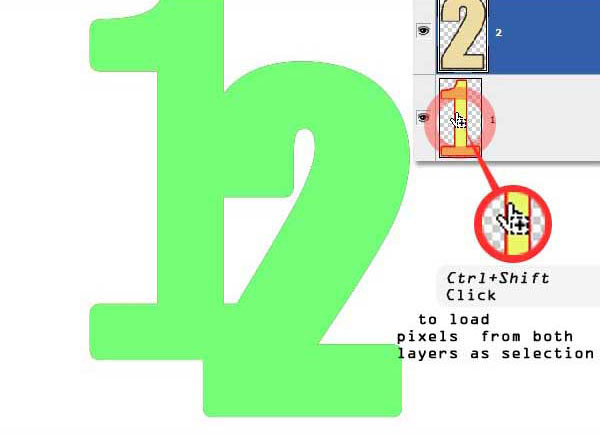
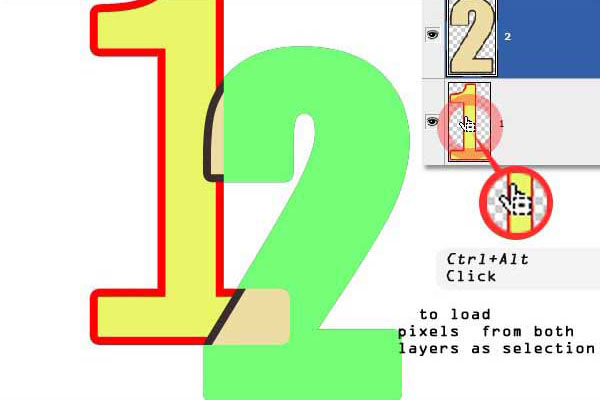
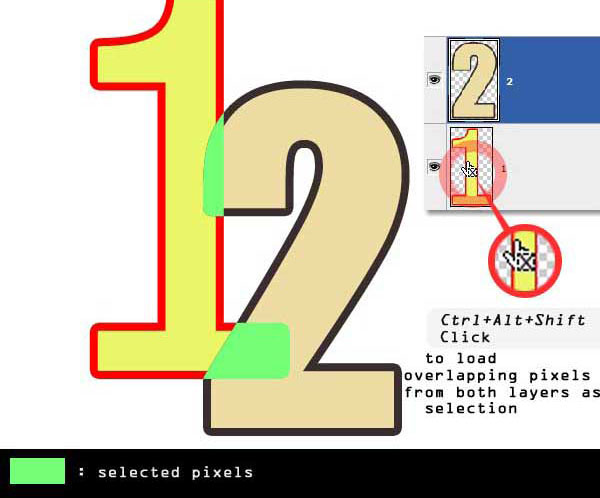
This example shows how to Load, Add, Subtract, and Intersect selections between overlapping layers just with quick thumbnail clicks.
Load Pixels to Selections
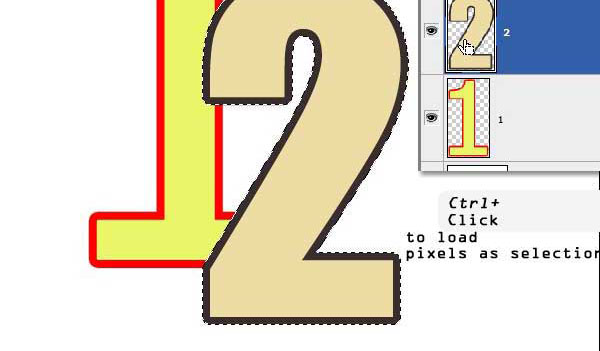
In “Layer 2″ Command-click to load a fill as a selection. Any pixel which is not transparent in “Layer 2″ will be loaded as a selection. This is not the same as copying the layer, only its outline. The green fill shows the selected region although you will get only the surrounding Marquee. Let’s call this state (with “Layer 2″ selected) the initial state.
Addition
With the “Layer 2″ loaded as a selection, Command + Shift-click on “Layer 1″ to add it to the selection. Now non-transparent pixels of both “Layer 1″ and “Layer 2″ are combined as the new selection. Notice the small plus sign in the Command-Click box.
Subtraction
Revert to the initial state and Command + Alt-click on “Layer 1.” This will subtract any overlapping pixel of “Layer 1″ from the current selection of “Layer 2.” Notice the minus sign.
Intersection
Revert to initial state and Command + Alt + Shift-click on “Layer 1″ to keep only the overlapping pixels as a selection. Notice the X sign. If the layers are not overlapping this action will deselect all.
Garbage Masks
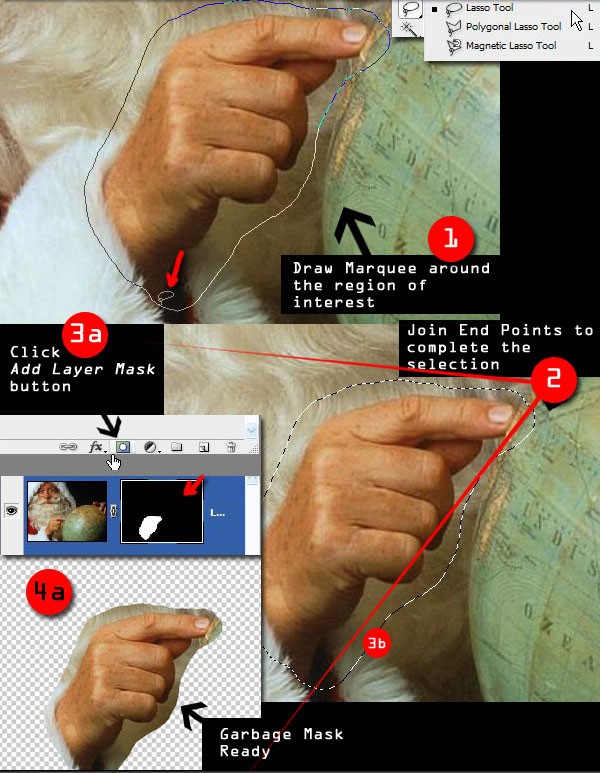
Garbage Masks are created to roughly isolate the ‘region of interest’ from rest of the image.
Further trimming is carried out inside the Garbage Mask with precision.
Vector and Raster Selections
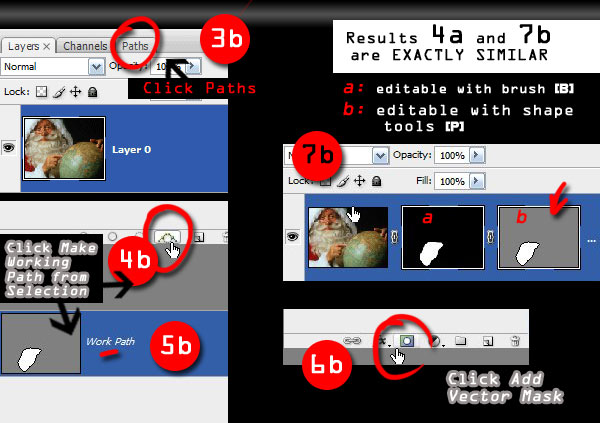
Draw an outline around the region of interest in the image with any of the Lasso Tools and double-click to complete the selection. A Garbage Mask needs to be saved for further refining, which can be done both as a Layer or Vector Mask. We must choose it depending on complexity of the outline and how we are planning to trim it later on. With the Lasso selection click Add Layer Mask to save it as a Layer Mask.
Alternatively, we can also save the selection as a Vector Mask which can be later refined by working on the shape spline that defines its outline. With the Lasso selection still intact (2), go to the Paths tab (3b) and click Make Working Path from the Selection button at the bottom. This will save the selection outline as a Shape Working Path.
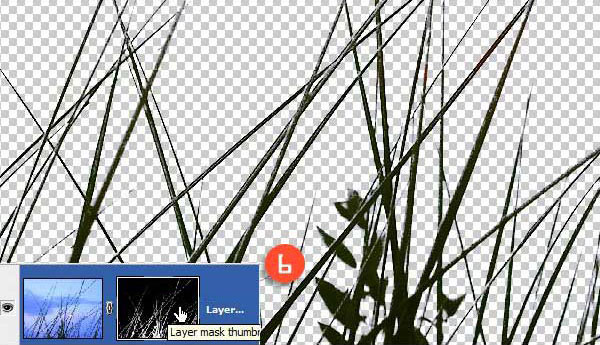
Now load the selection again, and return to Layers tab. Click Add Layer Mask once to create a Layer Mask (Command-click to load again) then click the same button( 6b) once more to Add Vector Mask. Saving selections as Vector Masks or Shapes saves memory.
Selecting with Vector Mask
Click on the Vector Mask to activate it. Or selecting any of the Shape tools will make it active. Vector Masks are modified by adjusting the spline positions (Control Points) and curvature (Tangents). You can disable, delete, or save the Layer Mask with another Layer. The Convert Point tool is most suitable for altering Vector shapes and Paths. Click and drag on the handles, then Command-click on control points to move them.
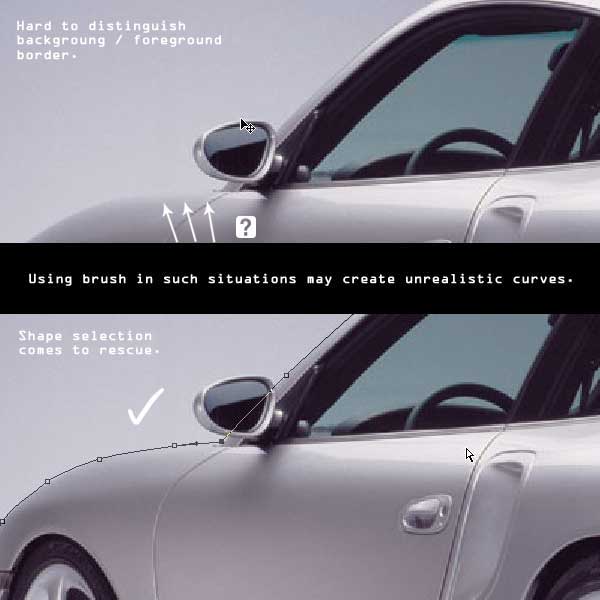
Once a acceptable outline has been achieved use the Add Points tool to refine and further match the outlines. Delete points when necessary. Dragging handles with Command + Shift will lock their relative slopes. Drag directly on the Control Point to reset handles. Regular curvy shapes are best to be extracted with this process.
This method is also best in situations where boundaries are not clearly visible.
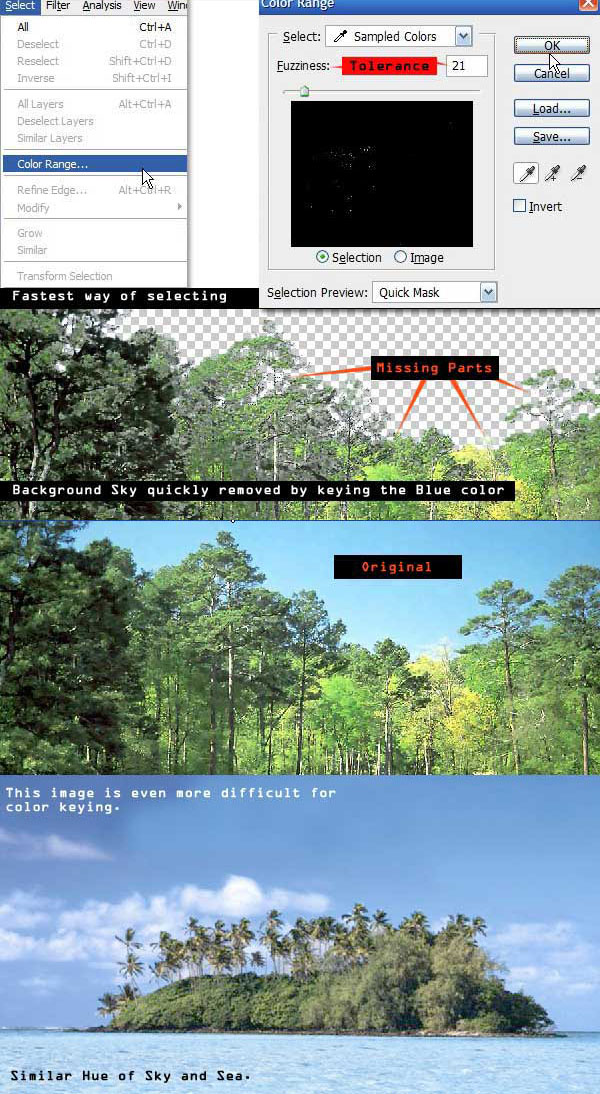
Select by Color Range
Selecting by color is the fastest way to Chroma select. Click Select > Color Range and select a color with the Eyedropper Tool available. Once selected certain shades can be removed selectively with the Minus (-) Eyedropper or again added with the Plus (+) Eyedropper. There is also a preview window that displays the selected region or the original image.
This tool can be used to setup Garbage Masks around the subject and later refine it with editing the Mask. Select by color is not a one-click solution, but does a great job in minimizing manual work.
Chroma from Channels
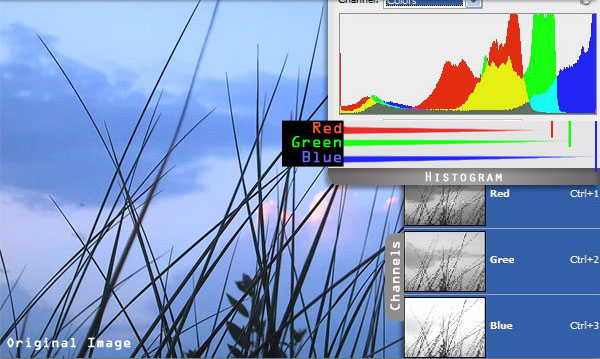
Color information of each type are stored in as separate channels, which can be viewed in the Channels Tab. We can use the channel wise variations in color intensities for selecting objects in the image. This process is helpful only when background and foreground have separate color distribution in at least one channel.
Advanced Chroma
In the Histogram we can see that the blue channel is predominant in the image and it extends up to the highlights where other channels are very weak. Our subject here is the patch of vegetation in foreground.
Picking the Best Channel
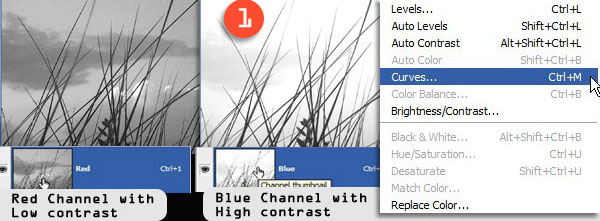
A simple observation of the three channels tell us that the blue channel has the highest contrast between the Sky and Grass. We are going to exploit this property to separate the two. Duplicate (Command + J) the Layer and go to the Blue channel of the Copied layer. Click Image > Adjustments > Curves or Press Command + M to apply curves modification on the current channel.
Applying Curves
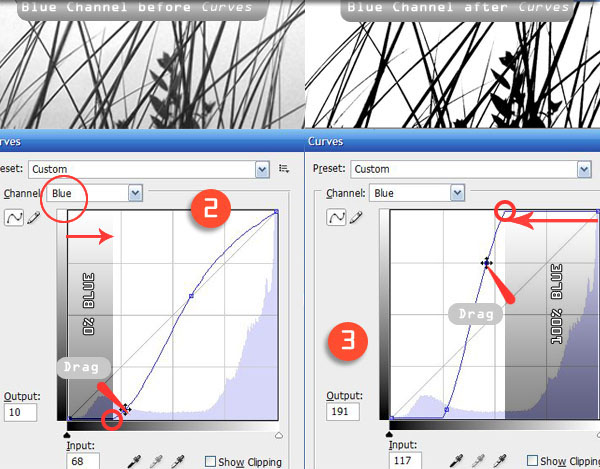
Select the point closer to the dark grays of the channel and drag it (2) forward in the x-axis (horizontally) keeping y-axis at 0 (shown by the small circle). This will make the darker pixels uniformly more darker. It shouldn’t affect the background, drag it a little back to left if it does.
Next, select another point closer to the White Point, drag it (3) back towards the midtones keeping the y-axis(vertical) at maximum (shown by the small circle). What we are doing is saturating the dragged range of blue up to 100%. Make sure the whole background turns white or almost so, and there is a very high contrast between the Grass and Sky.
Channel as Mask
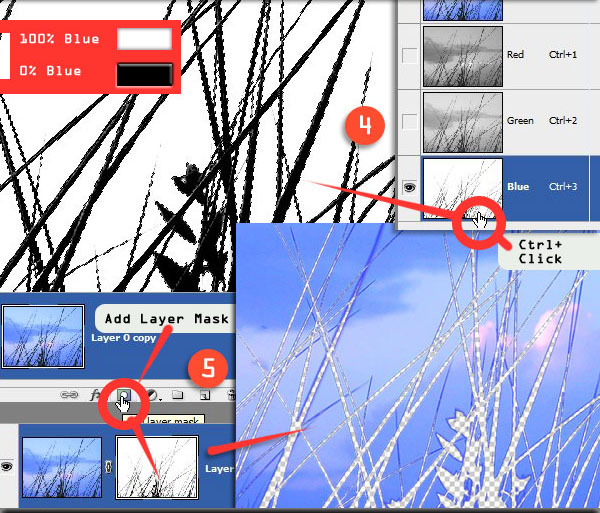
Command-click on the channel thumbnail to load the channel into the selection. Areas which are predominantly blue will be selected totally and the rest according to respective degrees. Areas which have no blue (the black parts) will be left from the selection. With the selection in place go to the Layers tab and click Add Layer Mask to save the selection as a Mask.
Inverting the Mask
Press Command + I to invert the Layer Mask.
Selecting by Brushing on Masks
Brush based selection is used to extract foregrounds with complex outlines with accuracy. It is also used to refine selections made with other techniques. And it also support transparency (softness).
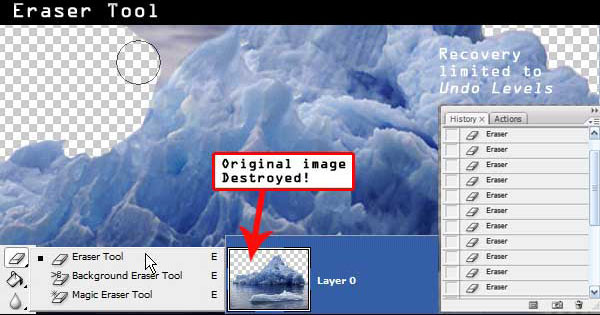
Erasing is probably the first thing that comes to mind when we talk about brush based selection. But it is not a recommended process at all. Erasing is a destructive process and can permanently damage the original image as recovery is limited only to a number of undo levels we have set.
Brushing with Layer Masks
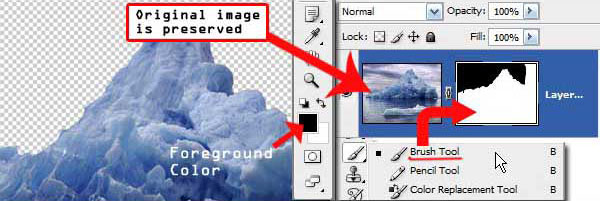
Here too Layer Masks can be used, to preserve the workflow of Eraser and additional possibility of recovering removed portions if they are needed. Painting on the Layer Mask with a White or Black will reveal or hide the contents respectively. We can brush out backgrounds in the same way as in using the Eraser tool and get it back by painting with White.
No Feedback
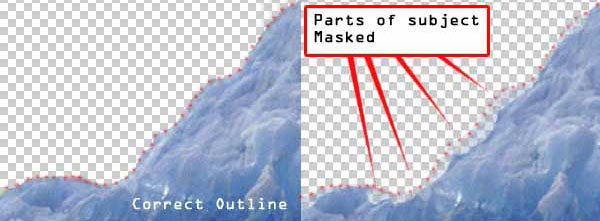
When brushing the mask we may sometimes trim off relevant parts accidently and keep focusing on the wrong silhouette only to be discovered later. This is highly probable when foreground background have similar hues and there is no immediate visual feedback.
Immediate Feedback
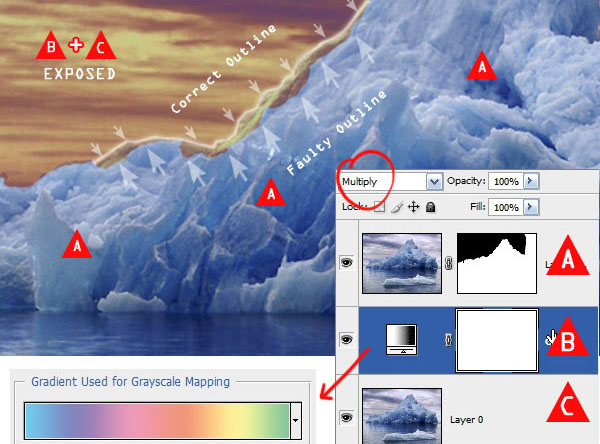
This problem can be averted by following a simple rule of keeping a multiplied duplicate of the current layer in the background as a guide layer. Multiplied gradient maps will show-up as high contrast versions of the subject outlines if violated.
Luma Select
As already mentioned Luma is the illumination levels of an image. Luma can be used to extract components from the image which have a considerable brightness difference than others.
Simplest Luma Hack
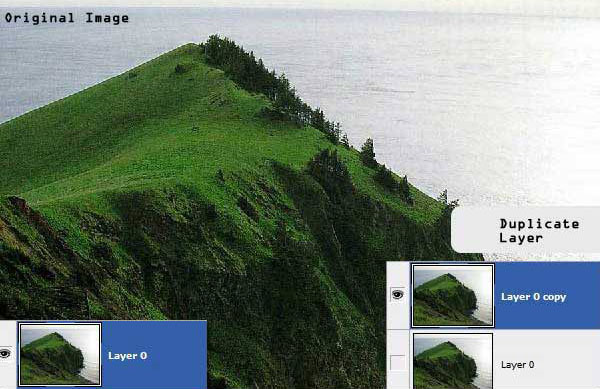
Unlock the background and make a duplicate of it, then hide the original Layer.
Apply Threshold
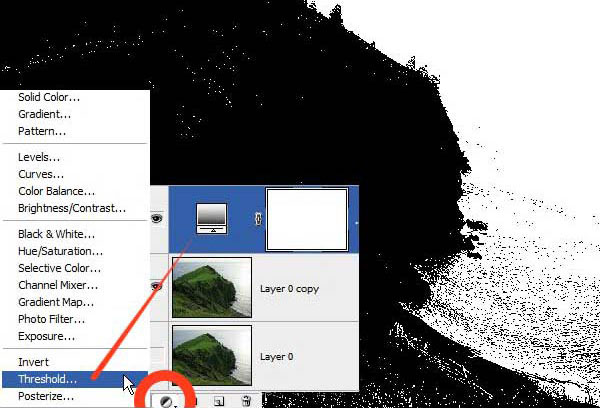
Apply a Threshold Adjustment Layer on top. You will notice that some parts of the image have been turned instantly black and rest are pure white, and there are no intermediate grayscale levels.
Adjust Threshold
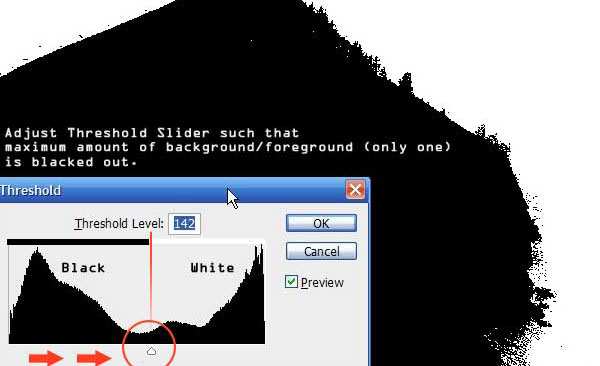
Adjust the Threshold Slider and try to enclose the subject or background (whichever is darker) in black. Hide the Threshold layer and look at the original image for guidance when required.
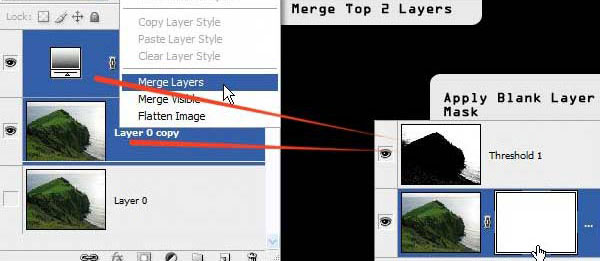
Merge Layers
Command-click to select the top two layers and Merge them into one. Select the bottom layer, make it visible and create a blank Layer Mask.
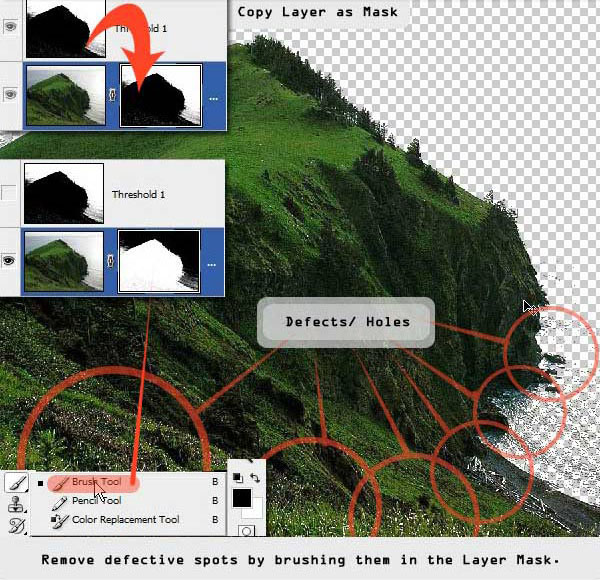
Add Layer Mask
Copy the merged image and paste to the Layer Mask, following the process discussed above. We have our Layer Mask ready, but in most cases there will be holes and parts of our background visible. Use the Mask Painting technique discussed above to make it tidy. Invert if necessary.
Luma Select with Transparency
The Threshold technique discussed above is very fast to implement, but is only useful for extracting solid objects as it lacks transparency. The following method can be useful in situations where we need Luma extraction with transparency. Here we are going to remove the ice-water from the rest of the rocks.
Using Luma to Mask with Transparency
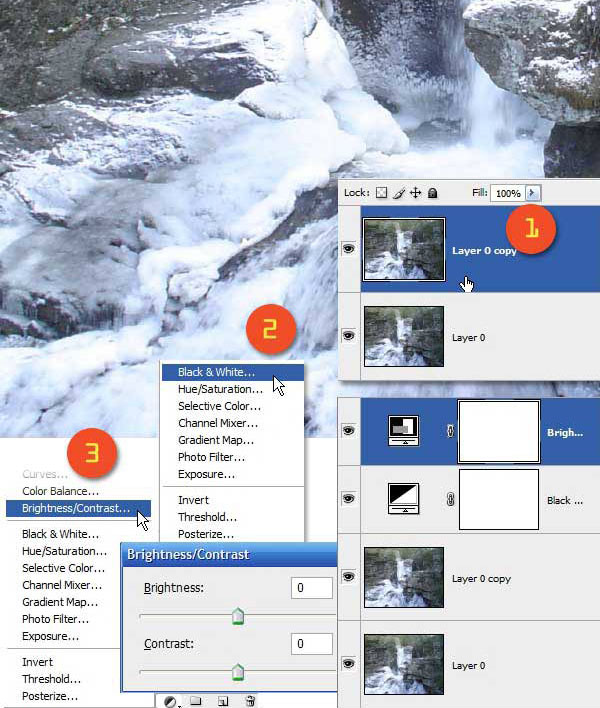
Unlock and Create a layer from the background (1). Apply an Adjustment Layer Black and White on top and then a Brightness-Contrast Adjustment Layer above it.
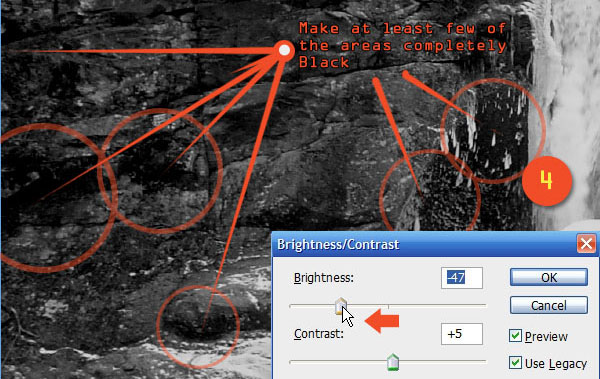
Reduce Brightness
Select Use Legacy mode and slowly move the Brightness slider to left, try to get as many black areas from the rocks as possible. This process will reduce the brightness of the Water too so don’t overdo it.
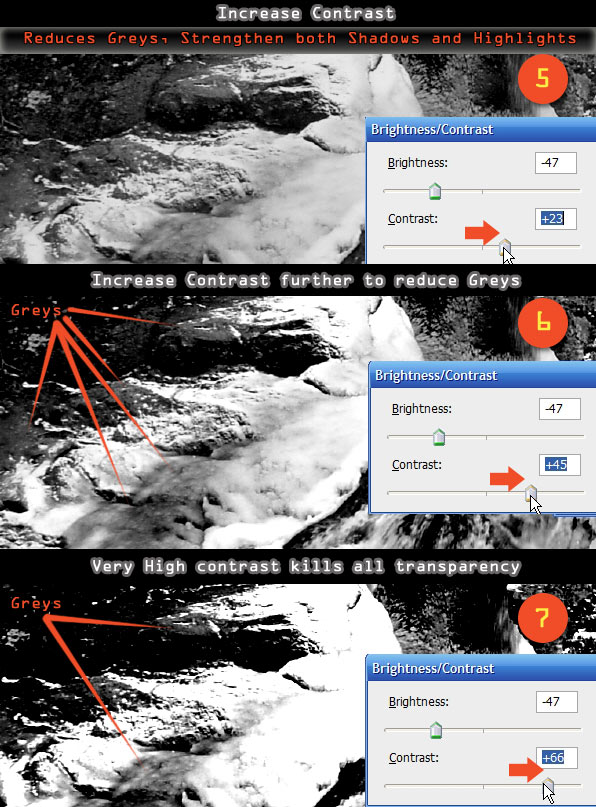
Increase Contrast
Now slowly increase the Contrast slider to the right. With each increase dark-grays will turn to black and lighter grays will glow more brightly. We are going to get the whites as opaque and grays as semi-transparent. Try to get both Whites and Grays where necessary. Over increasing the contrast will make it look like a Threshold Layer, if so there will be no translucency left.
.
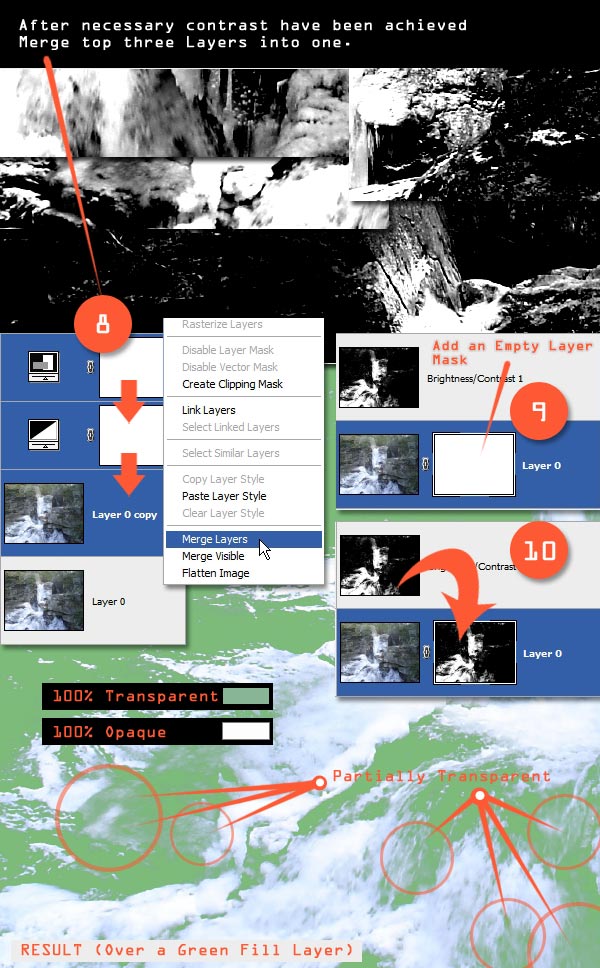
Merge the Layers
When satisfied with the results Merge the top three Layers. Go to the background layer and Add a Layer Mask and copy the merged Layer into the Layer Mask.
Yet Another Possibility
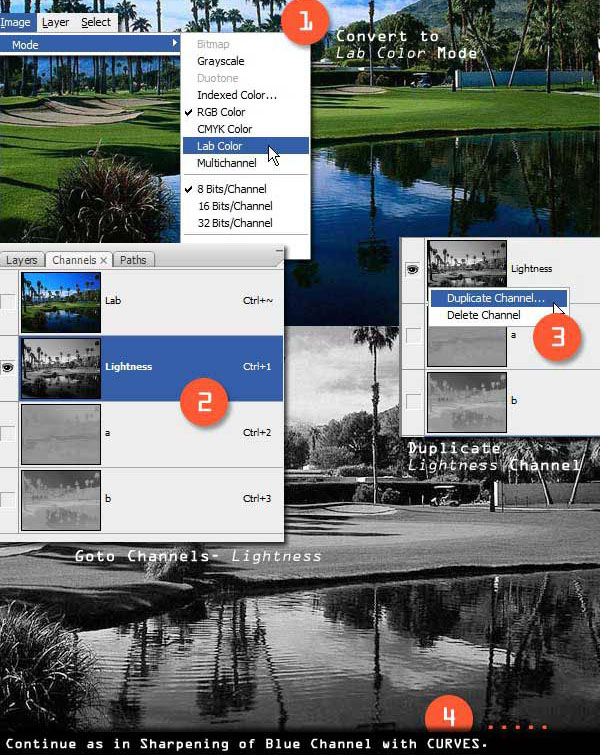
Other than the above two procedures there is also another way of Luma based extraction using the Lab color method.
Lab Color Technique
Open an image and turn it to Lab Color mode by clicking Image> Mode> Lab Color.
Goto Channels Tab and find the lightness channel or press Ctrl+1 to directly select it. This is where the illumination levels of all pixels are indexed in the Lab Color mode. You can play with that channel and try to isolate some element from the background. Don’t forget to duplicate the Layer or the Channel before you alter any channel.
And filters that doesn’t work on the image in Lab Color mode works on the Lightness channel, and yield almost similar results.
Conclusion
Photoshop has quite a few options when it comes to selection techniques. Try applying some of these solutions in your workflow to increase your productivity and effectiveness.
